Baritone Ukulele Self Instructor, page:06
A Simplified and Illustrated uke tutorial with Song Folio and Sheet Music for students and teachers.
| Share page | Visit Us On FB |
|
|
|||
|
DIAGRAM SYSTEM EXPLAINED 5
|
|||
|
|
|||
 |
 |
||
|
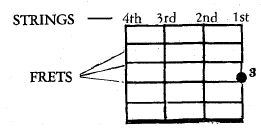
The diagram or chart is a simulated finger-
board, the vertical lines represent the strings and the horizontal lines the metal frets. The black dots • indicate the left- hand finger placements. The numerals 1, 2, 3, 4, designate the left-hand fingers to be employed. |
|||
|
|
|||
|
USEFUL HINTS FOR BEGINNERS
|
|||
|
|
|||
|
1. Be sure your instrument is correctly tuned.
2. If the tuning pegs slip, tighten the little screw at the bottom of the peg.
3. Learn the correct names of the component parts of the uke like, pegs, frets, etc., see page 1.
4. If you skipped over the previous pages of this book, you missed something you should have learned.
5. Don't try to learn everything at once.
6. The finger-nails of the-left-hand must be kept short, to allow the finger-tips to press firmly on the strings.
7. When a string is to be played without being pressed down by the left-hand fingers, it is termed
"open string." 8. The right-hand must pick or strum all four strings, regardless of how many strings are fingered with
the left-hand. 9. Strike the first chord of each song to properly pitch your voice for singing.
10. Keep the right wrist flexible as it is the secret to good technique.
|
|||
|
|
|||
|
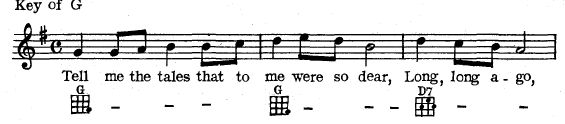
HOW TO PLAY THE DIAGRAM ACCOMPANIMENT
The chord or harmony changes are made by following the chord charts underneath the words. The small
dash — after a chart means to repeat until a new chart appears. The charts and dashes are placed near or under the word or syllable in the order which they are to be played and provides the correct rhythm beats. |
|||
|
|
|||
|
Long, Long Ago
|
|||
 |
|||
|
|
|||